Friday, January 31, 2014

Mixing Metallics- Foliage Fun!


Have you ever wanted to preserve a bouquet of flowers forever, without having to see dead brown flowers in your perfect vase????

I found the perfect solution this past weekend. I received a very special bouquet from a friend who was leaving the country for an entire year- I wanted to be able to keep the bouquet forever so that I could keep her close while she is away.

I've been really into metallics lately. If I could paint every single accent piece in my apartment metallic I probably would, but my roommate may just start seeing stars so I'll save it for my extra special pieces.

This is definitely a project you will want to do outside, as it gets pretty messy and the fumes from the paint can be really toxic, especially if sprayed within a small space. I took this project out to my balcony at my apartment and covered the tiles with a plastic bag.

I started my laying out my favorite pieces from the bouquet, in this case it happened to be more of the tall foliage rather than the actual flowers. You want to make sure to do this process before the bouquet starts to wilt too much, so that they are 'frozen' in an upright position.

Once I had selected the desired pieces and I covered them in a spray mount. This is an intense spray-glue that will keep the leaves/petals in the upright position and keep the petals in their natural form.

Let the foliage/flowers dry completely before turning them over and spray the other side the same way. Once completely dry, you can now spray paint with whichever color you prefer. (Let dry completely before flipping over to avoid access dripping) I used a metallic spray paint that was in between gold and silver. Remember mismatching golds and silvers around in your decor is totally okay!

I paired my new and improved foliage with a fun and funky vase I got from Ross. The vase also started out white! (I spray painted it with a gold paint---took about 3 coats, allowing dry time in between each coat)

I'm in LOVE with this new accent piece, it's something I can keep forever and cherish the memory behind it. Feel free to share your favorite DIY! <3


Tuesday, November 27, 2012

Coffee Table Makeover

Hi guys! So sorry it's been so long, I've been busy with various design projects and neglecting my blog quite a bit! I promised to share more, even during the crazy holidays!

One of my girlfriends just moved into her own apartment and really wanted to make it her own. She had some basic pieces but she was craving something that was full of color and life to go in between her living room chairs. 


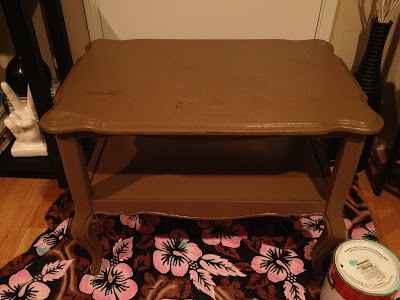
This table was given to me on a previous design project and I knew I wanted to redo it because of it's awesome shape and size. It's small but functional with the additional storage on the bottom shelf, and I absolutely adore the feminne shape! I started by cleaning with a damp cloth, sanding, and priming. 


Tiffany's blue is obviously my favorite color, as I continue to use it over and over. You just can't go wrong with such a classic color. It works in all types of spaces, especially when you need to add a bit of life! I used a regular can of paint from the hardware store and painted it with a brush. 


This particular client is a total girly-girl so I wanted to add stripes in something metallic to break up the blue a bit and create more detail. The gold gives in a perfect pop and makes the table appear more custom. It's fun to layer colors and patterns, it sparks conversation and interest! Make sure to wait until the first layer of paint is completely dry, then use painter's tape to get clean lines. Section off what you don't want painted, apply the second color and wait until it dries before removing the tape. I used spray paint for this layer. It's okay to mix mediums! 


With a little creativity and paint this table went from drab to fab in only a couple of hours. The color and stripes completely update the look! Please feel free to share some of your favorite design makeovers with me! 


Monday, October 15, 2012

Hampton's Style Chair Makeover

Okay, so I went a little crazy on the chair makeovers this weekend. This was another chair that was in great condition that was given to me. I liked the structure and the shape of the back, but hated the colors. I knew that this chair would look awesome in a bright color with a new seat.

Here's the before:
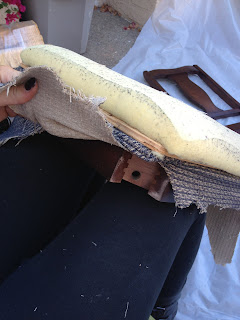
I started by taking the seat off of the chair. I had to flip it over and unscrew it from the bottom. The fabric covering the seat was glued on, but I could feel wood and a cushion underneath. I just went for it and cut the fabric right off. The cushion and wood separated easily.


After the seat was removed, I took the entire chair apart and cleaned the wood and spread all of the pieces out on a great plastic wrap I picked up from Joanne's Fabric. It's reusable and great for messy projects. I used a professional mint colored spray paint with a primer included. I chose a matte paint incase I later wanted to distress the paint a bit. 


I used a spray mount with a dark brown striped fabric to reupholster the seat. I loved the contrast of the brown and mint. It's masculin, yet feminine. It has a very Hampton's like feel...I was inspired to make this chair after a few visits to the Fairmont Hotel's newest club Bungalow in Santa Monica. The interior/exterior is completely like a Polo meets Ralph Lauren beach bungalow. 


Saturday, October 13, 2012

Purple Damask Chair Makeover

This old, broken and dirty chair was given to me instead of the dumpster at work! It was completely unstable and rather gross looking to begin with. My first step was to get a new screw and make sure the chair was functional before beginning with the paint. 

Once the chair was fixed and sturdy enough to actually sit in, I knew I wanted to reuse it. The lines were simple and the seat looked easy to reupholster. 

I began by removing the seat and cleaning the wood of all dirt and dust. You always want to make sure you are working with clean pieces when spray painting so the paint looks even. 


I picked a professional spray paint with a primer included to save time. I took my time letting each coat dry completely before spraying another. This step is super important when spray painting so that the paint does not build up and cause a drip. This has happen to me in the past and it looks sloppy and messy. Take your time! 


While I was waiting for the paint to dry I reupholstered the actual seat. It had a cover on it already, so I removed the staples and wiped it down. Then I put the cushion face down on my fabric of choice. I cut the fabric around the cushion in the shape of the seat leaving a 2" border. I then sprayed the back of the seat with spray mount around the border so that I could fold the left over fabric around the bottom. Make sure to pull tight and that there are no creases or wrinkles in the fabric on the top of the seat. The tighter you can secure the fabric to the bottom of the seat, the better. 


Once the paint on the wood was completely dry, I resembled the seat and voila! This chair has been reused, repurposed, and is now in fabulous condition. It's so fun to mix neutrals with pops of color. It's unexpected, fun, and multifunctional. It now works great as a vanity chair, or even as a simple statement piece for any room. 


Wednesday, September 19, 2012

Salon Makeover


The reception area in the salon that I work at was in need of a makeover. It had a really cute boutique feel before, but now that the salon is growing and the clientele is increasing, it only made sense to update the interior.

There are a lot of spray tans done at this salon, so I knew I needed to stick with colors that could take the over spray. The chairs before were so cute but were practically ruined by spray tan seeping from the rooms. I started with choosing a semi-gloss pant for the wall. I thought about doing the entire wall as an accent wall with one solid color, but then I realized it may actually make the place look smaller. I remembered learning how stripes elongate spaces. Vertical stripes make rooms appear taller, while horizontal stripes make rooms appear wider.


I used the same color on the doors across from the striped wall to unify the space-also to hide any spray tan that tends to seep out from time to time. I left the frames white to keep a nice contrast.


 The original desk was really cute but definitely needed a more professional desk with more separation. I browsed a few showrooms in Burbank and found a place where I was able to order one custom. I was able to select the shape, color, and exact size so that it would fit in the space perfectly. It was affordable and delivered directly to the salon!


Selecting chairs was a bit of a challenge. I needed to find something that was small enough for the space, and something dark. I first focused only on upholstered accent chairs, then I realized dining room chairs would really be a more ideal size. I knew microfiber material would be perfect because it's super easy to clean, and it also looks really fancy. I found these chairs at World Market in a beautiful chocolate suede. The quilted pattern on the back is a perfect match with the stripes and the rich wood. It almost reminds me of Hollywood Regency meets the beach.


The last item I purchased was the fun side table with the dark wooden legs. I loved the idea of a glass top because glass really helps spaces stay open and feng shui. (funk-shway) Topped it off with some greenery and some magazines and voila! Brand new look and feel. I couldn't be happier with the way it turned out.

Tuesday, September 18, 2012

Tiffany's Nightstand Makeover


One of my girlfriends really wanted to find a unique and affordable nightstand or dresser to add additional storage to her closet. We browsed a little and ended up finding a great piece that had a ton of character, and no serious flaws as far as structure. Those two elements are always important when selecting something to redo. 


This stand was only $20.00 so we couldn't resist! I love the flower details on the doors.

First we made sure to lay out a plastic tarp that we got at the hardware store. It really pays off to invest in items you can use over and over when crafting. The tarp will protect the ground and creates a great surface to be painted on. 

It's really important to completely wipe down and item with rubbing alcohol or an all purpose cleaner before painting. That way, no dirt or dust will get stuck under the paint creating an unfinished, bumpy look. Next, always be sure to use a primer of some sort. Many spray paints now have primer included, so just be sure to look. I really liked this particular brand of spray paint because it's able to be used on multiple surfaces and dries really fast! We decided that powder blue and pearl were the colors we would use. 


Always remove doors first on items like this. I unscrewed all of the hinges and knobs and placed them off to the side. These doors look so cute in a modern  color! Totally accentuates the floral carving. I made sure they were completely dry before putting them back on the nightstand. I spray painted all of the knobs and hinges, and screws separately and off to the side. I chose to use a white to give it a Tiffany's look. I covered them completely with two coats and let them dry 
completely.


After everything was totally dry, I reassembled the nightstand and maneuvered it into the closet for additional storage. The finished piece looks so cute and updated! Adds a great pop of color to the closet and is visually interesting. 


Thursday, September 6, 2012

DIY Birthday Cake-Pops

Being that it was my birthday yesterday- It was only appropriate to finally try making cake-pops at home! I found a recipe online but ended up going off track here and there-

First, I gathered all ingredients that you would normally use for a standard cake mix. Use any type of cake batter you would like. I chose vanilla-being my favorite. 


Make sure to include the yolks in the mix, cake- pops need to be made from moist cake. I used a 9x9" pan and poured about half of the batter in the pan, baking for 25 mins total. Put the baked mix directly into the fridge, letting the cake sit for at least an hour so it's completely cool. 


Once the cake batter has cooled, break up the mix using clean hands into crumb-like pieces. Just kneed the batter until there are no more huge chunks of cake. Add a few table spoons of vanilla frosting to the broken up cake mix and blend together. The frosting should be evenly distributed throughout the batter.  It should eventually be sticky enough to be able to create a large ball of cake.


Once this is done, break off parts of the large ball into smaller ones- a little smaller than two inches in diameter. Set the small balls of cake on a greased cookie sheet off to the side.


Next, you will need to find a chocolate coating for the outer layer of the cake-pops. I used a white chocolate, they come in chocolate chip form as well which is easy to melt. Melt the chocolate chips in a small bowl, mixing the chocolate every 20 seconds. Be extremely careful not to burn the chocolate.


After the chocolate is melted, dip any type of lollypop stick into the melted mix. Immediately insert the chocolate coated stick into the small pre-rolled cake pop and let the chocolate cool inside of the cake. Making it sturdy enough to hold up the cake. Let the cake pops cool again for an additional hour.

If you are planning on coloring the cake pops, definitely use white chocolate so it's able to be colored. Milk or dark chocolate will not work for this style. Heat more white chocolate, mixing every 20 seconds again. I added a little bit of red food coloring to make the white chocolate pink! Use any color that you may like for outer shell of cake pop.


Dip the cake balls into the colored white chocolate, covering the cake batter completely. The best way for them to harden and dry, is by sticking them into something styrofoam so they are able to dry standing up right. Once they were upright I added some fun sprinkles. Place the cake-pops back in to the fridge overnight. More decor can be added once they have hardened. Super easy and fun to make at home! Great for birthday parties-less messy than cupcakes!